
I usually start my posts with some personal anecdote explaining the background for what I’m writing and how I came up with the idea. I could probably do the same for this one, but the truth is that I’m writing it because I ❤️ permissions. I don’t exactly know why they hold such magic for me, but it is what it is, I get excited about permissions. User roles, checking who’s allowed to do what and when, and making sure it all works together is just the best kind of fun!

You might not share my excitement, and that’s OK, I guess, but permissions are one of the basic building blocks of almost any application. The permissions framework I’ll present here can start simple and evolve as you go, so you can be sure you are gonna need it and it’s definitely worth the small effort of setting it up from the get-go.
Better to Ask Permission
In the most basic sense, permissions are about determining what the current user of the app can or can’t do. Can they edit this item or just view it? Are they allowed to access the page? Can they change this setting or not?
It Depends
Sometimes there’s a grey area between permissions and business logic. Let’s say you’re creating a market place app where sellers can only post 10 items for sale unless they opt for premium access. Is posting the 10th item allowed? No. But is it blocked because of permissions or because of business logic? Let’s check:
My rule of thumb for deciding if a specific action should be under the permissions model or handled by business logic is whether the answer for a specific user is always the same, without changing that user’s permission directly. Permissions is a meta-concern; if the answer changes according to some state change within the app, that’s a good sign it’s a business logic issue.
So if we look back at that 10 items limit — the user can post an item 10 times, but not the 11th time. There’s definitely some business logic in there, it can’t be determined based on identity alone.

Enabled vs. Allowed
I’ll call actions which are governed by identity “allowed”, as opposed to actions governed by business logic which are “enabled”. It’s possible that the UI result will be the same, but it’s useful to have a common terminology moving ahead. The rest of the post will discuss how to determine whether an action is allowed, anything that should be enabled should be handled by your business logic and not part of the generic cross-concern permissions framework.
Permission Categories
There are several categories by which we can classify permissions:
Role based
Checks if you have the correct role to perform some action. For example, in our marketplace app — a seller can post an item for sale, but a buyer can only purchase it. A customer service rep might be able to view anything the users see, but be blocked from editing anything.
Tier Based
Some features might be open only to paying customers, for example — the option to post more than 10 items for sale. Premium customers might have even more options open — e.g. custom advertising or other special features.
Feature Flags
Some features might be A/B tested or on a gradual rollout, and only available to some users based on some arbitrary flag. For example, we might be rolling out a new feature enabling uploading a video for a posting, but not opening it to everyone at once.
Context Based
Some actions might be allowed in general, but based on identity and the current context. For instance, you might be a seller who has permission to edit an item for sale, but you can only edit your own items, not someone else’s.
Edge cases/custom logic
In the real world there’s always going to be something weird that doesn’t quite fit in the the permissions framework, so we have to allow for custom logic in the very rare case you’ll need it.

High level: how are we going to do this?
The high level scheme is simple: Each action will know if the action is allowed for the current user by checking each of the permissions categories.
You might consider grouping your permissions by category instead of action, but from my experience — features are added much more often than you add tiers or roles to your system, so when you add a single feature, you’ll end up having to add it’s permissions in a lot of different places. That’s harder to read and understand, and much harder to copy-paste. Sometimes you just want a feature to have the same permissions as “that other action”, having all the permissions grouped together under an action makes duplicating them much easier.
Tier/Role based logic
Tiers/Roles can usually be combined in various ways to specify the exact user type. It’s tempting to try to model this as a matrix, where the permissions are specified for the intersection of tier and role:
✔ – Allowed ✖ – Not allowed ? – Invalid combination
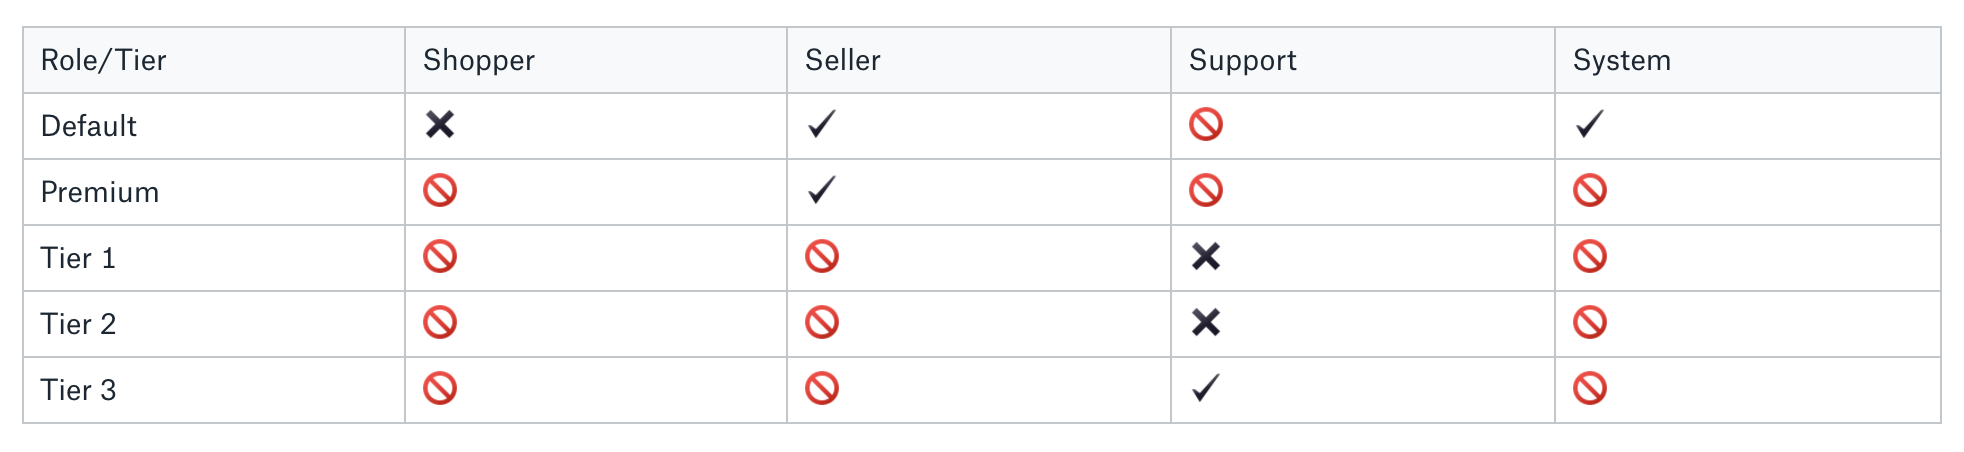
As you can see, most of the cells in the matrix are not valid combinations. In code, this creates a lot of overhead and confusion, forcing you to handle options which should never occur.
At this point you might decided to create a hierarchical structure similar to this:
PERMISSIONS = {
  RoleEnum.Shopper : {
    TierEnum.Default : False,
  },
  RoleEnum.Seller : {
    TierEnum.DefaultSeller: True,
    TierEnum.PremiumSeller: True,
  },
  RoleEnum.Support : {
    TierEnum.TierOne: False,
    TierEnum.TierTwo: False,
    TierEnum.TierThree: True,
  },
  RoleEnum.System: {
    TierEnum.Default : True,
  }
}
This can work, but it’s harder to read, it forces us to have a Default tier for users who don’t really have a tier like Shopper and System, and we still have to handle invalid cases.
There may be cases where you may find the matrix or hierarchical structure inevitable, but as a best practice I suggest flattening the tiers and roles into a single user type and use that as your key for permissions:
PERMISSIONS = {
  UserType.Shopper : False,
  UserType.Seller : True,
  UserType.Seller_Premium: True,
  UserType.Support_TierOne: False,
  UserType.Support_TierTwo: False,
  UserType.Support_TierThree: True,
  UserType.System: True,
}
Feature flags
Since this permissions framework assumes one class definition per action, you can only set a single FEATURE_FLAG. Multiple feature flags don’t make sense in this granularity, as you would have to apply custom logic to decide what to do if one feature flag is enabled and not another. Hopefully, if you stick to checking all your permissions through this framework, you won’t have to handle such a special case, but if you absolutely must — use the custom logic option (I will give an example later).
Context based
Context based permissions border on custom logic, but since they occur frequently, we’ll probably want to add some built-in support for common use-cases. The exact scenarios depend on your system, and can be added as need arises.
Beware of adding too many of these, as they complicate the action class and add a lot of overhead to creating new actions.
For this example I will address one such common scenario — allowing an action only if the context user is the same as the acting user.

Class Action
The basic component of our permissions framework is a base class which holds the default logic for your permissions check. I would call it Action because it’s a good name and as an added bonus you get to have a very punny class Action in your code (which, in my opinion, is totally worth it). Let’s see what we’ve got so far:
Permissions = namedtuple("Permissions" ["allowed","check_same_user"])class Action(object):
PERMISSIONS = {
# I'd go with naming the tuple values explicitly in
# production code Permissions(allowed = False, check_same_user =
# False) but this margin is too narrow to contain UserType.Shopper : Permissions(False, False),
UserType.Seller : Permissions(False, False),
UserType.Seller_Premium: Permissions(False, False),
UserType.Support_TierOne: Permissions(False, False),
UserType.Support_TierTwo: Permissions(False, False),
UserType.Support_TierThree: Permissions(False, False),
UserType.System: Permissions(False, False),
} FEATURE_FLAG = None def allowed(self, user, context):
return (PERMISSIONS[user.user_type].allowed and
self._is_feature_flag_enabled(user, context) and
self._check_same_user(user, context)) def _is_feature_flag_enabled(self, user, context):
return (FEATURE_FLAG is not None and
feature_flags.is_on(user, context, FEATURE_FLAG)) def _check_same_user(self, user, context):
if not PERMISSIONS[user.user_type].check_same_user:
return True
return user.id == context.user_idThe default logic checks if the action is allowed for the user’s type and if a feature flag is set and on and if it should be the same user and is actually the same user.
From a security perspective, the default permission for any action is not allowed. Otherwise, if you forgot to handle some case, it would just be open to everyone, which is a gaping security hole. That’s why requiring the user to match all of the specified conditions is the more secured approach and probably also better aligned with business rules.
The potential damage of someone accessing something they’re not supposed to is so much higher than being blocked even from a critical component like login or billing. The first might result in a serious security breach which may be hard to recover from. The second is a temporary setback, however painful.
Subclasses built for actual actions should override the PERMISSIONS and FEATURE_FLAG values to suit their specific needs.
Anonymous users
You may have noticed I didn’t handle the option where the user has no role because they’re not logged in to the application. At the very minimum, the login page has to support anonymous users, and you probably have other surfaces which should allow access to anonymous users. I didn’t want to complicate the example code too much, so I’ll just outline the solution and continue ignoring that case:
For handling anonymous users I would suggest adding UserType.Anonymous to your permissions framework and using the Null object pattern to return an “empty” user with the user_type set to UserType.Anonymous when none exists. That way, you can avoid handling the anonymous user scenario explicitly in code, they’re just treated like any other user.
Example: View/Edit Items
If we return to our marketplace example app, we’d like to allow users of the application to view items for sale. All users can view items, so the PERMISSIONS are all set to True and there are no further limitations.
class ViewItemAction(Action): PERMISSIONS = {
UserType.Shopper : Permissions(True, False),
UserType.Seller : Permissions(True, False),
UserType.Seller_Premium: Permissions(True, False),
UserType.Support_TierOne: Permissions(True, False),
UserType.Support_TierTwo: Permissions(True, False),
UserType.Support_TierThree: Permissions(True, False),
UserType.System: Permissions(True, False),
}However, only sellers are allowed to edit an item, and only if that item belongs to them. So we’ll set permissions to False for shoppers, and only allow sellers to edit an item if it’s their own item. We’ll also allow support agents to edit items, but only from TierTwo. However, since support agents are not sellers — we shouldn’t check the context based “same user” permission.
class EditItemAction(Action):PERMISSIONS = {
UserType.Shopper : Permissions(False, False),
UserType.Seller : Permissions(True, True),
UserType.Seller_Premium: Permissions(True, True),
UserType.Support_TierOne: Permissions(False, False),
UserType.Support_TierTwo: Permissions(True, False),
UserType.Support_TierThree: Permissions(True, False),
UserType.System: Permissions(True, False),
}If we were rolling out a new edit experience, we could gate it with a feature flag like so:
class EditListingExperimentAction(Action):PERMISSIONS = {
UserType.Shopper : Permissions(False, False),
UserType.Seller : Permissions(True, True),
UserType.Seller_Premium: Permissions(True, True),
UserType.Support_TierOne: Permissions(False, False),
UserType.Support_TierTwo: Permissions(True, False),
UserType.Support_TierThree: Permissions(True, False),
UserType.System: Permissions(True, False),
}FEATURE_FLAG = "edit_listing_experiment"Custom logic
Every once in a while you’ll have an action that doesn’t fit neatly into these checks. Your feature may depend on two feature flags, or maybe you’ll have to check something very specific about the user. In those, hopefully rare, cases you can implement your own logic by overriding the allowed method:
class Action(object): def allowed(self, user, context):
return self._my_custom_check(user, context)Explicit, not redundant
You might notice both ViewItemAction and EditItemAction define all 7 user types and Permissions values. This might seem redundant, you could just have a generic ViewAction and EditAction inherit the values from them, only overriding whatever needs to be handled differently.

However, for every “exception to the rule” you’ll have to start a new inheritance branch, and you’ll soon find that your inheritance tree becomes fragmented, adding complexity and confusion to the code. When reading the code or debugging, you’ll have to go up the inheritance tree to check what’s allowed for who, which makes the process all the more difficult.
Being explicit has other advantages: Let’s be honest, a big chunk of what we do as software engineers is copy-paste code. If you only override some of the values, the next engineer to come along will copy-paste a similar action, without any visibility to the other values inherited from the parent class. Those inherited values could be wrong for their action, but they have no idea they’re even there and have to be dealt with.
Recently, I was involved in developing a feature which had some permissions/identity ramifications. One of our major problems was raising awareness to new features which had to take it into account. Linters and monitoring are pretty effective, but having to explicitly specify the behavior for that scenario would have forced developers to take it into account much earlier in their development process.
You should ensure each class specifies all the permission values explicitly by validating at compile time, with a unit test or a linter, depending on your language capabilities and how you built your class.
Checking permissions in action
Warning: this section is very pseudo-codey
Class Action is our interface for wherever the permission to perform an action has to be verified. Permission checks tend to proliferate in the code, because developers are justifiably afraid their code will be misused. But in most cases, a permissions check is only required in three places:
Frontend
To determine if UI elements should be displayed/enabled. The permissions values can be part of your element’s properties:
if (props.editAllowed) {
  return <MyButton />
}
Or it could be a separate common framework which mirrors the server-side actions structure:
if (EditItemAction.allowed()) {
  return <MyButton />
}
Endpoint access
Before allowing access to an API endpoint, you should verify the user has permission to do so. The simplest way to do this is to define a decorator on your endpoints which checks the permissions and returns a 403 (forbidden) error if the user doesn’t have permissions.
def allowed(action_class):
  def function_wrapper(func):
    if (not action_class.allowed(global_get_current_user())):
      raise PermissionDeniedException()

    func()

  return function_wrapper
@allowed(ViewItemAction)
def view_item(...):
my_endpoint_logic()Persistency
Before doing anything irreversible, like saving an entity to a database, you should check again if your user has the right permissions. The idea here is to be the last line of defense if someone called you from an endpoint protected by the wrong action:
@allowed(EditItemAction)
def save_item(user, item):
  _save_item_to_database(item)
Using a decorator has the added benefit of declaring very clearly and visibly which permissions are necessary to perform that action.
More fun with permissions
For this example I used hard-coded permissions in code for each action, but this could be easily done by entries in a database which could be modified live to block or open features to users.
For a B2B application you could even allow your customers to set their own custom permissions for each action if they wanted to. How cool is that?
Thanks for reading this far! I know every application is unique, but I hope the framework I’ve laid out here will help you design your permissions in a secure and extendible way which works for you.